Tuesday 24 March 2015

Review time: Yay or Nay?

Hello my lovelies and welcome back to my page!

Today I will be doing a review on my new brush set which I have purchased from eBay, and they are the Kabuki Brushes. 


This brush set is a ten piece set, with five face brushes and five eye brushes. The quality of these brushes are amazing, they feel soft and gentle on the face and the bristles do not feel or look fake. 
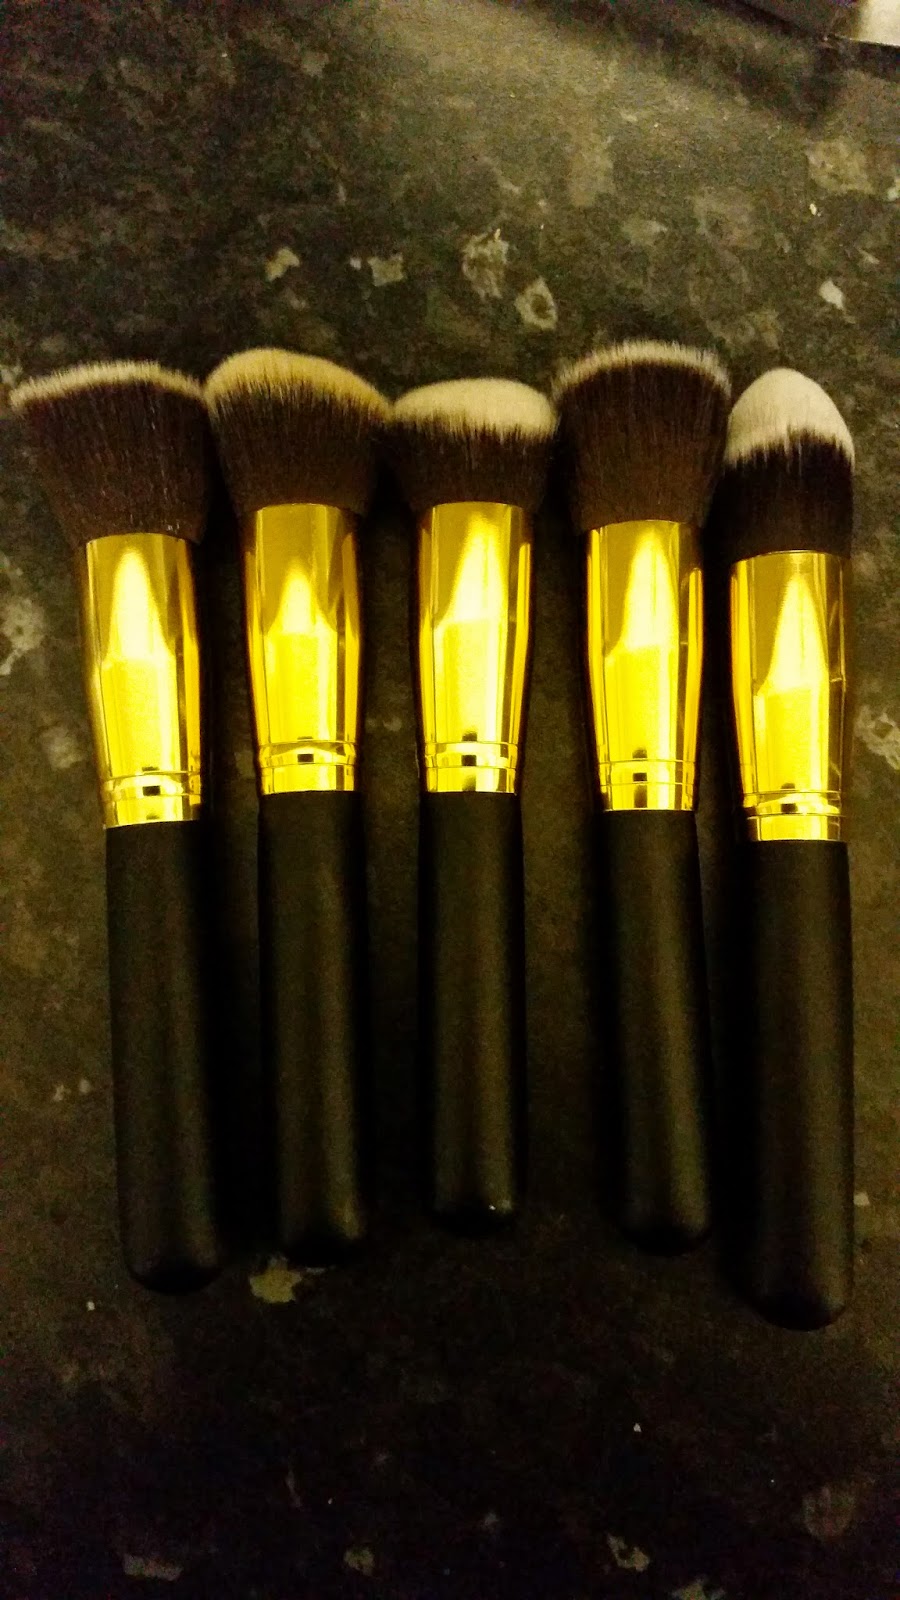
Face brushes:

  • Flat top face brush
  • Buffing brush
  • Angled face brush
  • Slightly less angled face brush
  • Tapered face brush
5 piece face brush

Eye brushes:
  • Flat top eye brush
  • Pencil/pointed eye brush
  • Rounded blending brush
  • Angled blending brush
  • Slightly less angled blending brush 

5 piece eye brush

These brushes are dupes for the Sigma brush set which costs way more than these, where as these brushes range from £8.00-£10.00 and for the price they are amazing! They do not shed when applying make-up and it applies it so smoothly. I am very, very ,very impressed with the face brushes as they are the most significant part of my make-up routine as I would always want to achieve a flawless base. Furthermore I find that the eye brushes also do a great job with blending eye shadow. I also use one of the brushes for concealer too, and it give me great results!

These brushes are very good when it comes to washing them,  have not experienced any sort of shedding or the glue rotting away  yet, and hopefully I will not see that happen! Also these are the brushes I use when I create make-up looks on Instagram, as well as the Real Techniques  brushes. 

These brushes are super amazing and super affordable, for beginners, anyone who want to start up as a make-up artist, and make-up brush hoarders like myself!

If you are planning to purchase them, then please do as I highly recommend these brushes to have in your brush collection! 

Would I purchase it again?

YES! 

I will purchase another two more sets if I have to! I love these so much, and for a beginner like me they are perfect!

I will put the link below, if you want to check them out.

10 piece kabuki brushes

Please follow me on Instagram for more looks and updates: @Ambiibeauty
Please also hash tag #Ambiibeauty me if you recreate looks, I would love to check them out!

I will talk to you soon, until next time!

-AmbiiBeauty xoxo

Saturday 21 March 2015

My contour and highlight make-up look from Instagram: Details!

Hello my lovelies, and welcome back to my page!

Today I am going to show you the details of my make-up look that I had posted on Instagram, yesterday. As well as more pictures which I took. 

Remember to follow me on Instagram @AmbiiBeauty for more looks and updates!


 Ok so lets start with the face.

On my face I had: 
  • L'oreal true match foundation
  • Mac matchmaster foundation (I mixed both these foundations together because the L'oreal foundation is a medium coverage and I wanted a slightly more medium-full coverage foundation). 
  • Contour- Sleek contouring and blush palette in the shade '373 Light'
  • Makeup revolution mono eyeshadow in the shade 'Deicious'
  • Blusher- Sleek contouring and blush palette in the shade '373 Light'
  • Highlighter- Sleek contouring and blush palette in the shade '373 Light'
  • Highlighter- L'oreal Paris Color appeal in the shade '23 Golden shimmer'
Eyebrows:
  • Collection eyebrow kit
Eyes:
  • Makeup revolution eye shadow palette in the shade 'Redemption palette iconic 2'
  • Makeup revolution in the shade- 'delicious' through my crease
  • L'oreal Paris Color appeal in the shade '23 Golden shimmer' on my lids
  • Eyeliner- Collection little mix black liquid eye liner
  • Mascara- Collection 'Big fake curves' and 'Super size fat lash mascara'
Lips:
  • Sleek lipstick in the shade 'Barely there'
  • MUA lip luxe in the shade 'Tranquillity'
  • Rimmel London provocalips in the shade '730 Make your move' 
And that is it! All these products used to achieve the desired look that I wanted. 

If you want to recreate this look please hash tag me #Ambiibeauty also follow me on Instagram @Ambiibeauty, for more looks and updates! 

Please comment and share with all your friends!

Will talk to you later, until next time! 

-AmbiiBeauty

Saturday 14 March 2015

How To: Lip tutorial in 5 easy and simple steps!

Hello my lovelies, and welcome back to my page!
Today I am going to show you a step by step pictorial of the way I would apply my lipstick/matte lip glosses on my lips, for that full and voluminous effect. 


If you enjoyed this look please comment below and let me know about your thoughts.

Also follow me on Instagram: @AmbiiBeauty and if you recreate this look please hash tag me; #Ambiibeauty  

Now, on to the pictorial:

Step 1: 
Line your lips with your favourite lip liner, and outline your lips carefully, make sure to take your time with this step as you might make a mistake. In this case I am using the LA girl endless lip liner in the shade 'wine'.


Step 2:
Once you have done that, start to contour your lips, it will look really weird at first, but trust me it will al come together when you are done. Begin to draw a line from the top of the bottom lip until you reach the bottom of the lip. Then draw two diagonal lines beside the line you have created. Finally sketch an upside down triangle from the top of the top lip downwards and then go back up until you reach the to again.  
This seems complicated but it will be shown in the picture below:


Step 3:
Next with a light lipstick begin to apply it directly onto your lips making sure that you do not blend the lip liner away entirely. I used the Sleek lipstick in the shade 'barely there' which is a light peach nude colour on my lips.


As you can see below I have applied the lipstick onto my lips making sure that the lines were not completely erased. 


Step 4:
The next step is to make your pout to appear 'fuller' what you have to do is apply a lighter shade of lip gloss/lipstick to the centre of your lips to make your lips to appear bigger. Once you have done that blend it in with your finger or lip brush, but making sure it is focused on the middle of you lips and dragging it outward. I have used the MUA lip luxe in the shade 'tranquillity'


Once you have done that take your lip liner and then reline your lips so your lips look three dimensional as opposed to a flat two dimensional shape. 
This is the look you are going for, my lips instantly appear to look fuller, even when I smile.


Step 5:
BLEND BLEND BLEND... Until you have your desired look! 

And there you have it guys, five simple and easy steps to follow for fuller and voluminous lips. Make sure you comment below and follow me on Instagram for more reviews and updates, also if you recreate this look make sure you use the hash tag #AmbiiBeauty


Friday 13 March 2015

Kendall Jenner inspired make-up look (at the amFAR gala in New york)

Hello my lovelies, and welcome back to my page!

Today I am here to show you which products I have used from my previous post on my Instagram. This look was inspired by Kendall Jenner (at the amFAR gala in New York). She looked absolutely beautiful and she was glowing like a golden goddess. She wore a red thigh high split gown, and paired this with a very neutral eye look and a red, with an orange undertone, matte lipstick. 

Kendall Jenner's make-up look at the amFAR gala
I have recreated this look using drug store make-up, and I also put my own twist on this look, however you do not have to copy the look I did, you can jazz it up however you like!

 
In the picture of Kendall Jenner she had a nude eye shadow colour, which actually looked like her skin tone, and it looked as though she had a slight definition through her crease. However I have used a champagne eye shadow colour on my lids and a slightly warm toned brown through my crease. I have also lined my top lash line with eye liner, which she did not have in the picture and I also applied mascara. She also defined her eye brows in the event, and of course I also did the same, but I have sightly thicker eye brows than her.  

For this look I used:
L'oreal True Match foundation (W3)
Collection concealer
Rimmel stay matte powder(001 Transparent)
Sleek contour palette, to contour (light)
Sleek contour palette, to highlight (light)
Collection shimmer shades, blusher
Makeup Revolution London in the name: Redemption palette iconic 2, for the eyes
Collection Little mix liquid eye liner and the Rimmel glam eyes liquid eye liner
Finally the most important part of this look... THE LIPS! 
I lined my lips with the LA girl endless lip liner in the shade Wine; just to define my lips and then on top of that I applied the Sleek Matte me lip gloss in the shade Rioja Red

So there you go my lovelies, these are the products I used in order to create this Kendall Jenner inspired look. I hope you lovelies enjoyed this post!
Comment on this picture and let me know about your thoughts about this look. Also I would love it if you could also recreate this look and use the hash tag #AmbiBeauty on Instagram.

Please also follow me on Instagram @AmbiiBeauty for more posts and pictures as well as reviews. 

Also stay tuned for my next post of a How to: lip tutorial, which will be up and published on Saturday.

Thank you so much for supporting me throughout this experience, I really appreciate it! 

I will chat to you lovelies later, until next time!


Sunday 8 March 2015

Review time: Yay or Nay?

Hello my lovelies, welcome back to my page!

I would like to do a review about the Rimmel London provocalips in the shade 730 Make your move. It comes in a 7ml bottle altogether, and it is double ended. The matte side has 4ml of product and the gloss side has 3ml of product. The price of this product is £6.99 which is a decent amount to pay, This colour is my type as it is a mauve/pink combined colour and I love these lip glosses as they're matte (normal ones never last on me!)


The applicator comes with you standard doe foot on both ends, and when I apply them onto my lips it goes on like a dream! It is so creamy and silky on the lips and them it will turn matte. The glossy finish on top of the matte lip gloss gives a very nice shine to the lips. But personally I do not ike glossy lips but this one was good.


The only criticism I have to make with this product is that the matte lips gloss is a little bit sticky on my lips, and it gets quite annoying, but it does wear out throughout the day.


This lip gloss claims to be a 16 hour long wearing lip gloss! I have to admit I did sleep overnight with it over night and it was still there! Like one touch up and your good to go! It is extremely matte and it claims to be kiss proof, and I totally agree with this. I was also eating throughout the day and it did not ruin my lips at all. 

But overall I am very impressed by this product, and for being a drug store one and having a price like that is amazing! 


But, will I purchase it again? YES! 


I would love to expand my collections of these lip glosses, regardless of the stickiness I have to say that they are very long wearing and that is what intrigued me the most, because seriously no other lip gloss will stay on my lips. Like give it half an hour and it will disappear!


Please let me know if you have tried this product, in the comments below, and I would love to read your opinions and thoughts about it. 


Please also follow me on Instagram: @AmbiiBeauty

I will chat to you lovelies later, until next time! 


-AmbiiBeauty xx 


Saturday 7 March 2015

Review time: Yay or Nay?

Hello my lovelies, welcome back to my page!

Today I am back with a review on some products, from the drug store, and I am just going to say a few words about these products and how I personally liked/disliked them.

Now lets talk brows; I cannot live without my brows ans I purchased the MUA brow define which comes in a 4.8ml bottle. First impressions? A little goes a long way! This products is not too runny or thick, but just the right consistency to carve the brows out and define them. It comes with a spoolie applicator so that you can apply it directly with the brush, however I use an angled liner brush. The only criticism I have to make is that it is not good to apply without a brow gel to set it, as it is not waterproof. 

But, will I purchase it again? MAYBE, to know why this is, please read below. 

MUA brow define
On to the next brow product, this time it is the Collection brow kit. It comes as a trio of brow powders with a brow gel (2ml bottle) and a double ended brush, one which is angled and one that is flat. The colours are great because it has a dark colour for people who have naturally dark brown/black hair. The second colour is a medium brown colour and I combine both these colours to give me the desired look that I want to achieve. The third colour is suitable for people who have lighter hair, such as blonde/light brown. I use the brow gel in order to set my brows in place, and it does not budge!
This is why I would prefer this product over the brow define, because I know it will not let me down, as it gave me a natural looking brows. 

Collection eyebrow kit
Will I purchase again, YES!


Finally I would like to talk about mascara, the Collection super size  fat lash mascara, which comes in a 8ml bottle and the Collection big fake curves which also comes in a 8ml bottleBoth these prducts come in a plastic package but the Collection big fake curves has a pointed glass textured lid.
Both these products are amazing the Collection super size mascara comes with your standard mascara wand and when I apply it, it gave me length to my lashes. Where as the Collection big fake curves has a ball shaped wand, which I found quite weird. But it takes time to get the hang of using it. This mascara, however gave me fuller and more voluminous lashes. I combine these both to give me the desired look that I want to achieve. However if you are not fond of the 'spidery' lashes then this look is not for you, but you might prefer these on its own. 

But, will I purchase it again? HELL, YEAH!

Collection super size fat lash mascara and Collection big fake curves


Collections super size fat lash mascara wand


Collection big fake curves mascara wand
This is all I have to say about these products. Please let me know if you have tried these products and how you got on with them, I would love to hear your opinions. 

Make sure you follow me on Instagram: @AmbiiBeauty

I will chat to you lovelies later, until next time... xx

-AmbiiBeauty

Sunday 1 March 2015

Get to know me...

Hello my lovelies, My name is Ambia Begum and I am a beauty blogger. I have started to blog about makeup, my makeup looks as well as clothes and FOOD! This is because I have been inspired by many Youtube gurus as well as beauty bloggers on Instagram, and the positive feed back that they obtain from the public/viewers is amazing! 

I would love to share some reviews and opinions on products which I have used so far as well as keep you up to date with makeup looks!


If you have any questions to ask me please comment them, and I will try my best to answer them.


I hope to talk to you soon, my lovelies, until next time!


Please also follow my Instagram page: @AmbiiBeauty


-AmbiiBeauty